Hi, I am trying to figure out how to create a moving picture slider in my funnels like the below screenshot. Can someone please assist me with the steps/code for how to do so? Thanks in advance.

1 Like
Hi @Zoo I hope you doing good,
I’d be happy to help you create a moving picture slider for your funnels! Below are the basic steps using HTML, CSS, and a bit of JavaScript/jQuery:
1. HTML for the Slider:
First, you’ll need to structure your slider:
<div class="slider">
  <div class="slides">
    <img src="image1.jpg" alt="Slide 1">
    <img src="image2.jpg" alt="Slide 2">
    <img src="image3.jpg" alt="Slide 3">
  </div>
</div>
2. CSS for Styling and Movement:
This CSS will help create the sliding effect:
.slider {
  width: 100%;
  overflow: hidden;
}

.slides {
  display: flex;
  width: 300%;
  animation: slide 10s infinite;
}

.slides img {
  width: 100%;
}

@keyframes slide {
  0% { transform: translateX(0); }
  33% { transform: translateX(-100%); }
  66% { transform: translateX(-200%); }
  100% { transform: translateX(0); }
}
3. JavaScript (Optional for Control):
You can add JavaScript/jQuery if you want manual controls or advanced features, but the above code will run the slider automatically.
If you’d like me to set this up or customize it further for your specific funnel, feel free to reach out!
Best regards,
Abdulrehman Asif
Thank you much Asif! Could you please also outline the steps to get this coding into Funnelish? I am not familiar with how to add the HTML and CSS coding onto the platform.
Thanks again,
Daniel
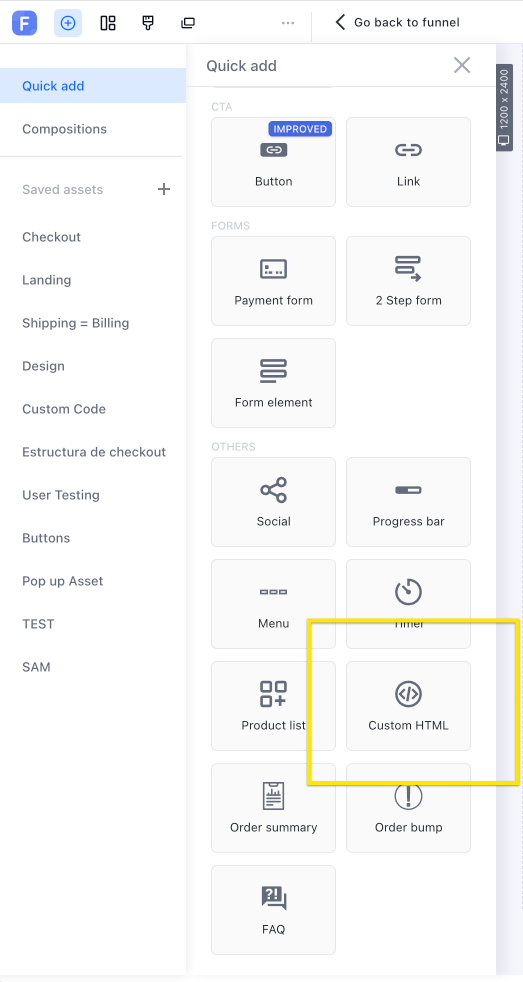
Hi @Zoo to add CUSTOM HTML you can do it by first adding a custom html element
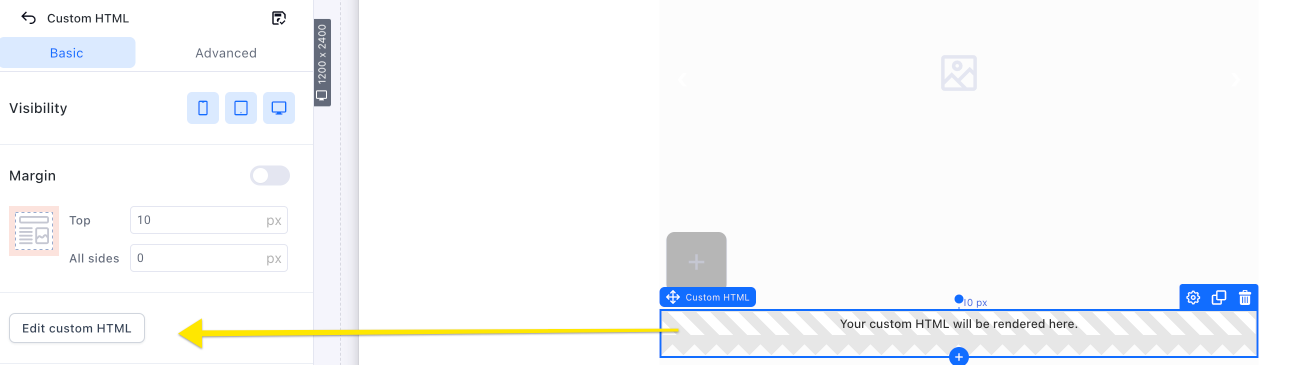
Then click on the element > Edit custom HTML to add the code
Under CUSTOM CODES > You can add custom CSS, custom javascript head (head HTML) and custom javascript body (body HTML)
Thank you both so much!!
Hi @Zoo to accomplish this please follow the guidelines below:
-
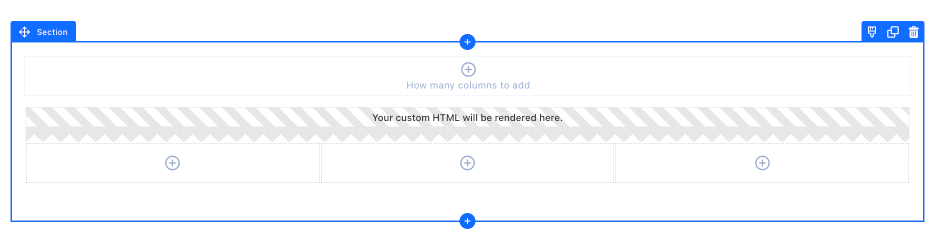
Create a SECTION
-
Add 2 ROWS
- Leave the top row empty
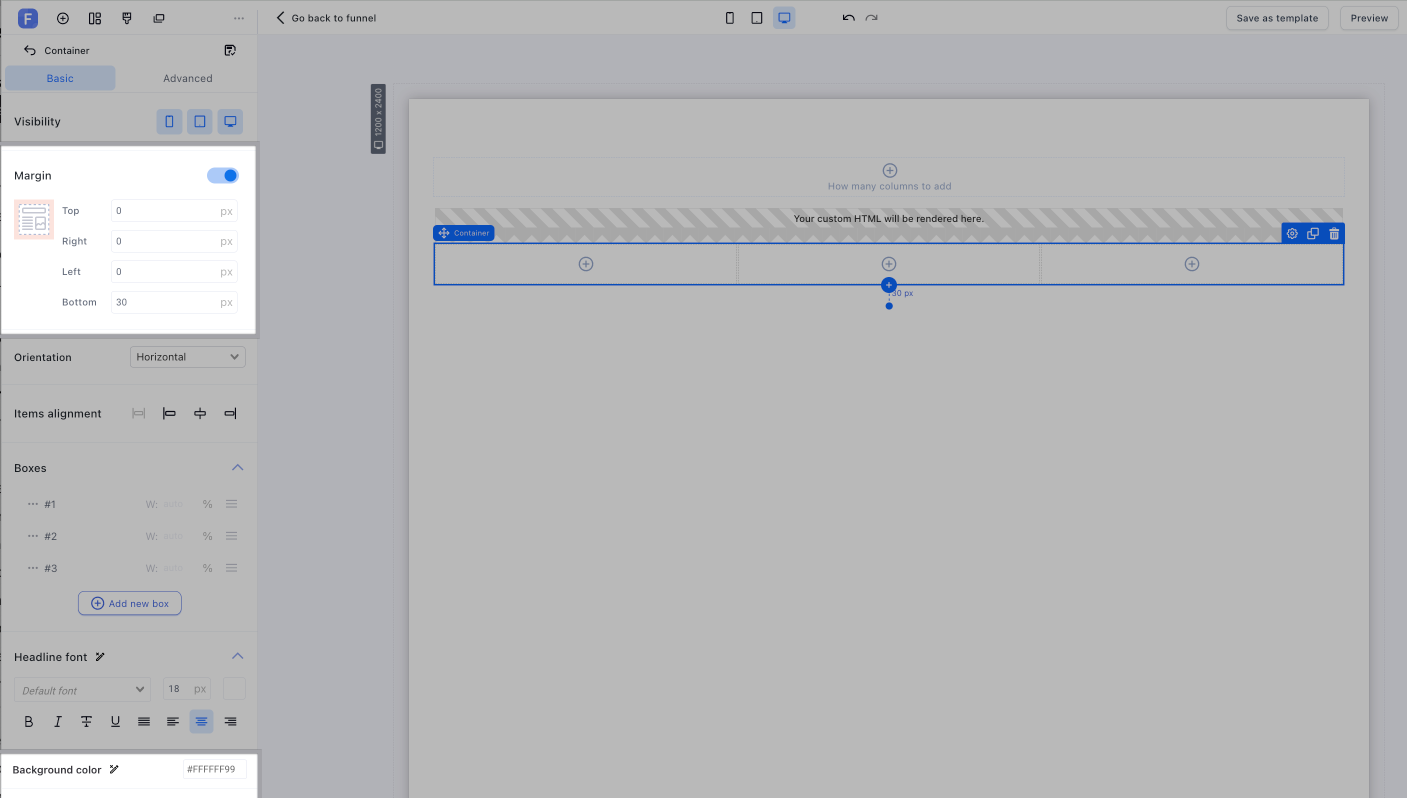
- Click inside the bottom row > Add a CUSTOM HTML element and below, a CONTAINER with 3 boxes
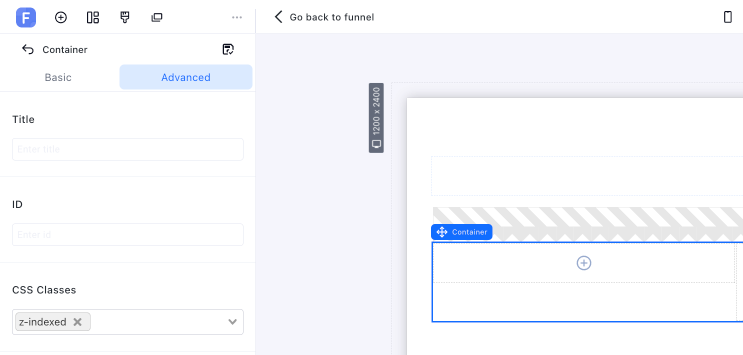
- Now click the CONTAINER and set it up as shown below:
- Then click on ADVANCED tab and add the class
z-indexed
The main structure should now look like this:
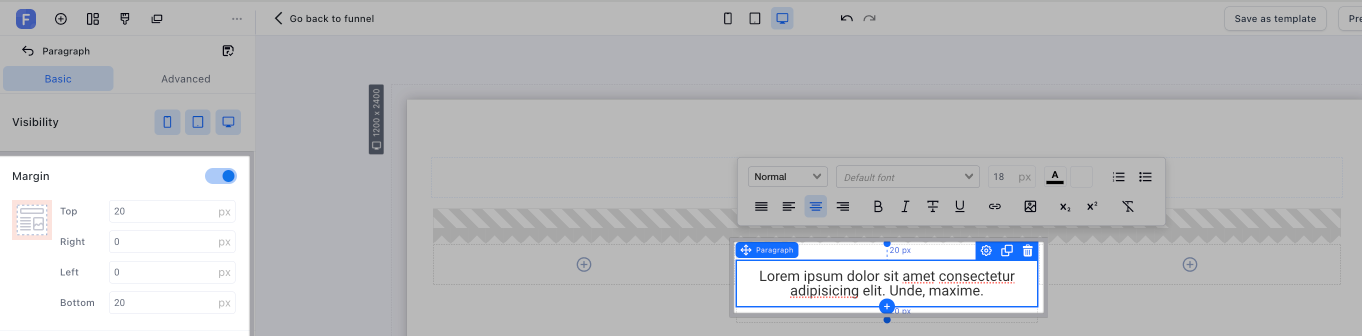
- Now click the middle container add a paragraph element > set it up with these details:
- Click on the CUSTOM HTML element > Edit Custom HTML and place this code:
<div>
<script src="https://cdnjs.cloudflare.com/ajax/libs/gsap/3.12.2/gsap.min.js">
</script>
<style>
.f-width {
  max-width: unset !important;
}
.ms-wrapper{
    overflow: hidden;
}

.imageContainer{
  display: flex;
  flex-direction: row;
  gap: 25px;
  width: 200%;
}

.imageContainer .image{
  height: 80px;
    width: 100%;
    object-fit: scale-down;
}
</style>
<div class="ms-wrapper">
  <div class="imageContainer">
        <img class="image" src="https://img.funnelish.com/9071/343821/1715322698-LOGOHUMO.png">
        <img class="image" src="https://img.funnelish.com/9071/343821/1715322703-LOGODAGALLEMAAL.png">
        <img class="image" src="https://img.funnelish.com/9071/343821/1715333851-CIRCLE.png" >
        <img class="image" src="https://img.funnelish.com/9071/343821/1715333853-images%20%282%29.png">
        <img class="image" src="https://img.funnelish.com/9071/343821/1715333852-59edf7a014ec26190033b8303c0cd602_icon.png">
        <img class="image" src="https://img.funnelish.com/9071/343821/1715333929-volkskrant1883.logowik.com.webp">
        <img class="image" src="https://img.funnelish.com/9071/343821/1715696012-Nu-nl-logo.png">
        <img class="image" src="https://img.funnelish.com/9071/343821/1715333854-images%20%281%29.png">
  </div>
</div>


<script>
let loop = horizontalLoop(".image", {speed: 1, repeat: -1, paddingRight: 25});

function setDirection(value) {
  if (loop.direction !== value) {
    gsap.to(loop, {timeScale: value, duration: 0.3, overwrite: true});
    loop.direction = value;
  }
}

Observer.create({
  target: window,
  type: "wheel,scroll,touch",
  onDown: () => setDirection(1),
  onUp: () => setDirection(-1)
})
/*
This helper function makes a group of elements animate along the x-axis in a seamless, responsive loop.

Features:
 - Uses xPercent so that even if the widths change (like if the window gets resized), it should still work in most cases.
 - When each item animates to the left or right enough, it will loop back to the other side
 - Optionally pass in a config object with values like "speed" (default: 1, which travels at roughly 100 pixels per second), paused (boolean), repeat, reversed, and paddingRight.
 - The returned timeline will have the following methods added to it:
   - next() - animates to the next element using a timeline.tweenTo() which it returns. You can pass in a vars object to control duration, easing, etc.
   - previous() - animates to the previous element using a timeline.tweenTo() which it returns. You can pass in a vars object to control duration, easing, etc.
   - toIndex() - pass in a zero-based index value of the element that it should animate to, and optionally pass in a vars object to control duration, easing, etc. Always goes in the shortest direction
   - current() - returns the current index (if an animation is in-progress, it reflects the final index)
   - times - an Array of the times on the timeline where each element hits the "starting" spot. There's also a label added accordingly, so "label1" is when the 2nd element reaches the start.
 */
function horizontalLoop(items, config) {
	items = gsap.utils.toArray(items);
	config = config || {};
	let tl = gsap.timeline({repeat: config.repeat, paused: config.paused, defaults: {ease: "none"}, onReverseComplete: () => tl.totalTime(tl.rawTime() + tl.duration() * 100)}),
		length = items.length,
		startX = items[0].offsetLeft,
		times = [],
		widths = [],
		xPercents = [],
		curIndex = 0,
		pixelsPerSecond = (config.speed || 1) * 100,
		snap = config.snap === false ? v => v : gsap.utils.snap(config.snap || 1), // some browsers shift by a pixel to accommodate flex layouts, so for example if width is 20% the first element's width might be 242px, and the next 243px, alternating back and forth. So we snap to 5 percentage points to make things look more natural
		totalWidth, curX, distanceToStart, distanceToLoop, item, i;
	gsap.set(items, { // convert "x" to "xPercent" to make things responsive, and populate the widths/xPercents Arrays to make lookups faster.
		xPercent: (i, el) => {
			let w = widths[i] = parseFloat(gsap.getProperty(el, "width", "px"));
			xPercents[i] = snap(parseFloat(gsap.getProperty(el, "x", "px")) / w * 100 + gsap.getProperty(el, "xPercent"));
			return xPercents[i];
		}
	});
	gsap.set(items, {x: 0});
	totalWidth = items[length-1].offsetLeft + xPercents[length-1] / 100 * widths[length-1] - startX + items[length-1].offsetWidth * gsap.getProperty(items[length-1], "scaleX") + (parseFloat(config.paddingRight) || 0);
	for (i = 0; i < length; i++) {
		item = items[i];
		curX = xPercents[i] / 100 * widths[i];
		distanceToStart = item.offsetLeft + curX - startX;
		distanceToLoop = distanceToStart + widths[i] * gsap.getProperty(item, "scaleX");
		tl.to(item, {xPercent: snap((curX - distanceToLoop) / widths[i] * 100), duration: distanceToLoop / pixelsPerSecond}, 0)
		  .fromTo(item, {xPercent: snap((curX - distanceToLoop + totalWidth) / widths[i] * 100)}, {xPercent: xPercents[i], duration: (curX - distanceToLoop + totalWidth - curX) / pixelsPerSecond, immediateRender: false}, distanceToLoop / pixelsPerSecond)
		  .add("label" + i, distanceToStart / pixelsPerSecond);
		times[i] = distanceToStart / pixelsPerSecond;
	}
	function toIndex(index, vars) {
		vars = vars || {};
		(Math.abs(index - curIndex) > length / 2) && (index += index > curIndex ? -length : length); // always go in the shortest direction
		let newIndex = gsap.utils.wrap(0, length, index),
			time = times[newIndex];
		if (time > tl.time() !== index > curIndex) { // if we're wrapping the timeline's playhead, make the proper adjustments
			vars.modifiers = {time: gsap.utils.wrap(0, tl.duration())};
			time += tl.duration() * (index > curIndex ? 1 : -1);
		}
		curIndex = newIndex;
		vars.overwrite = true;
		return tl.tweenTo(time, vars);
	}
	tl.next = vars => toIndex(curIndex+1, vars);
	tl.previous = vars => toIndex(curIndex-1, vars);
	tl.current = () => curIndex;
	tl.toIndex = (index, vars) => toIndex(index, vars);
	tl.times = times;
	tl.progress(1, true).progress(0, true); // pre-render for performance
	if (config.reversed) {
	  tl.vars.onReverseComplete();
	  tl.reverse();
	}
	return tl;
}
</script>
<div>
- Go to CUSTOM CODES > CUSTOM CSS and paste this code:
@keyframes slideLeft {
  0% {
    transform: translateX(0);
  }
  100% {
    transform: translateX(-100%);
  }
}

.sliding {
  width: 100%;
  overflow: hidden;
  position: relative;
  display: flex;
}

.sliding img {
  width: 100%;
  height: auto;
  animation: slideLeft 8s linear infinite;
}


.image-slider img:nth-child(2) {
  animation-delay: -5s;
}
.z-indexed {
  z-index: 5 !important;

}
- Lastly click on the container > go to the top margin and apply a -90px top margin by clicking the down arrow key on your keyboard
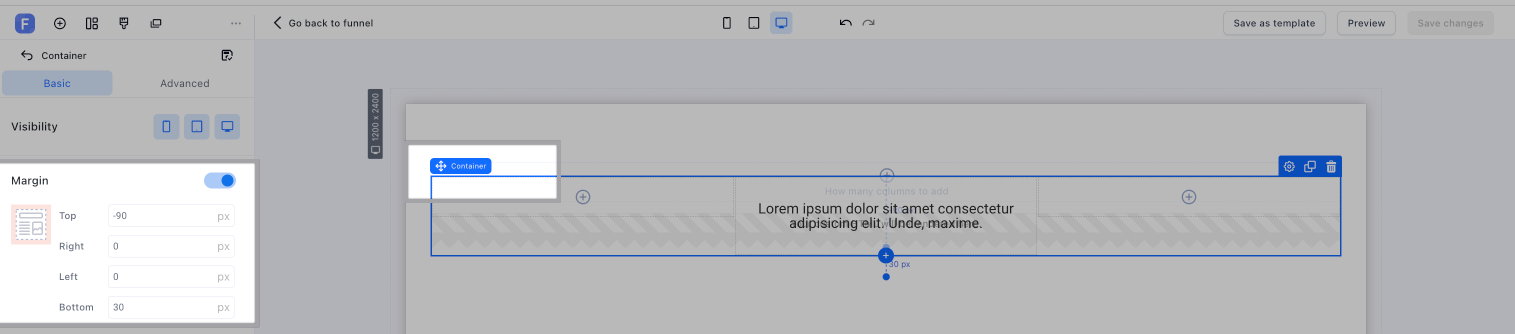
Save the changes and you’re all set!
@Belen is this also applicable on mobile version?
Yes, this setup should work on mobile devices as well! The slider is built with responsive styling in mind, so it should adjust nicely across different screen sizes.
If you notice any alignment issues on smaller screens, just make sure your container widths are set to 100% and images are using object-fit: contain or scale-down as needed.
Glad to see you’re exploring it — and happy building! ![]()