If you want to use S2S tracking or webhook automations with Funnelish, you can capture URL parameters such as clickid and store them as metadata in the funnel.
This allows you to pass the value later through tools like Zapier or webhooks.
Funnelish does not currently provide a dedicated S2S tracking guide or a built-in list of webhook parameter tokens for trackers like Voluum.
However, you can still pass custom values by:
- capturing the parameter from the URL
- storing it in a hidden form field
- saving it as customer metadata
- sending it later through Zapier or a webhook
Step 1: Get your tracking setup
Check your tracking platform (e.g., Voluum) to get your tracking link or postback URL.
https://website.com/offer-2022?clickid=12345
Step 2: Add the tracking code to Funnelish
Open your Funnel>Settings (gear icon)>Custom Codes>Tracking Codes>Create a new code
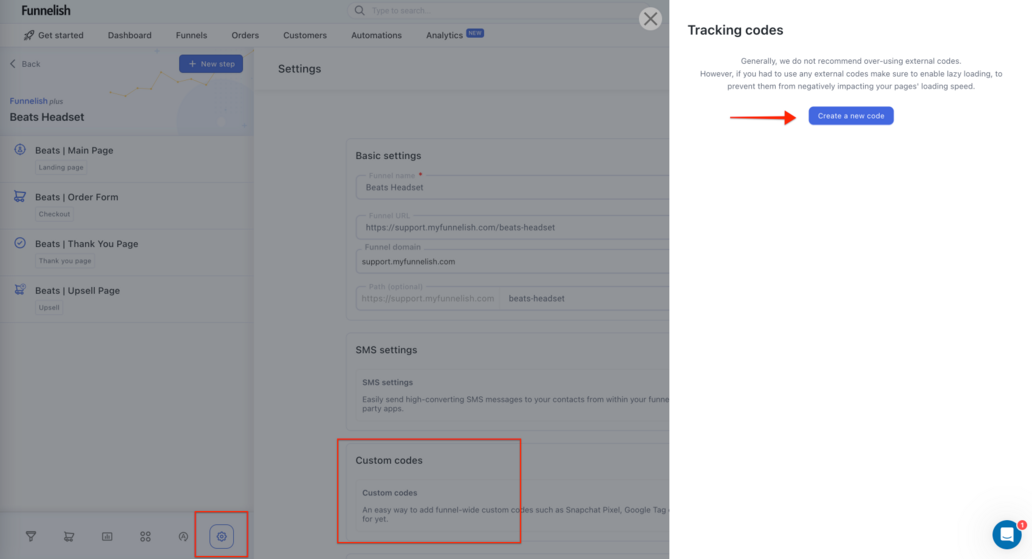
- Paste your script
- Select Append to Page Body
- Click Save
Step 3: Configure URL Parameters
If your tracking setup involves URL parameters (e.g., clickid), you need to capture and pass them through the funnel.
Add JavaScript to capture the parameter
const urlParams = new URLSearchParams(window.location.search);
const clickID = urlParams.get('clickid');

if (clickID) {
    let inputField = document.querySelector('input[name="clickid"]');

    if (!inputField) {
        inputField = document.createElement('input');
        inputField.type = 'hidden';
        inputField.name = 'clickid';
        document.querySelector('form').appendChild(inputField);
    }

    inputField.value = clickID;
}
Where to add this code
You can add the script in either:
- Funnel Settings → Custom Codes → Tracking Codes → Append to Page Body (applies to all pages)
- Page Settings → Custom Codes → BODY HTML (applies to a specific page)
How it works
- The script reads the clickid from the URL
- Stores it in a hidden form field
- Saves it when the user submits the form or completes a purchase
What happens next
- The value is stored in the customer profile as metadata
- It appears alongside fields like name, email, and address
- In tools like Zapier, you’ll see it under Meta fields
- You can use it in webhooks or zaps for tracking and attribution
Step 4: Store the ClickID in Funnelish
Once the customer submits the form or completes a purchase:
- The clickid is saved automatically as customer metadata
- It becomes available alongside other data like name, email, etc.
Step 5: Send the data through webhooks or Zapier
You can now use the stored clickid in:
- Webhook automations
- Zapier integrations
Step 6: Test your setup
- Open your funnel with a test URL (e.g., ?clickid=12345)
- Complete a test order or form submission
- Check if the clickid is saved in the customer/order data
- Confirm it is passed correctly in your webhook or Zap
Your funnel will capture URL parameters (like clickid) and make them available for webhook automations and tracking.
If you’re unsure whether your custom field is being saved correctly, feel free to test it and send us screenshots of your setup. ![]()
You can reach out to us directly at [email protected], or simply click the bubble chat icon inside your dashboard, we’re here and ready to help ![]()