Deprecated: This plugin has been entirely deprecated, though it still works, but won’t receive any maintenance or regular updates. Instead use our new Funnelish App
In This Article
- Introduction
- Installation Basics
- Features
- Installation For Dummies!
- How To Install (Long Boring Instructions)?
- 1 Click Upsell Hack For Paypal
- Completed
1. Introduction
It’s finally here, the long-awaited plugin. ![]() YAY!
YAY!
So for the last few of weeks, I’ve been thinking of building a plugin that allows any Clickfunnels user to accept both Credit Card and Paypal payments simultaneously through their Clickfunnels Funnels without having to tweak anything or having to give-up their upsells/down sells…etc
Well… I finally made it, now you may freely integrate both and even triple your purchase rate…YEP, that’s right Triple! during the short testing phase, I’ve managed to triple my front-end purchase rate by simply integrating this plugin into one of my funnels.
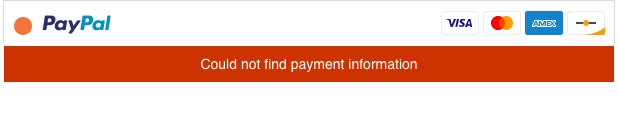
Bummer! Unfortunately, neither the Dashboard chart nor the Stats Tab was tracking any of my Paypal sales within Clickfunnels but at least the backend sales list was tracking them…I’ve contacted support and they confirmed that it’s a known issue within Clickfunnels and it’s going to be solved shortly…
I’ve also noticed that by simply adding this plugin, it added more trust to the whole page, and conversion rates even through Credit Card sky-rocketed as well.
I did my best to make this plugin have the look&feel of a Shopify store’s checkout page…There are millions of Shopify stores out there, and I’m confident that all your potential customers have gone through at least a dozen of them, and they know how it goes.
Anyways, without any further ado, to the plugin:
2. Installation Basics
Clickfunnels tracks Paypal sales by adding your products at the Funnel’s backend, that way you’ll get all your purchases and contacts for both credit card gateways and Paypal at the same place.
Failing to setup Paypal products at the funnel’s backend will result in Clickfunnels “not tracking” your sales, but that doesn’t mean it will hurt your conversion rates or actual sales being made in any way.
This plugin supports both Order Bumps, OTOs (Maximum 4 OTOs per funnel step) I thought that’s sufficient ![]() unless someone can prove me wrong by showing me their weird funnel, I won’t consider increasing the number of supported OTOs at this moment.
unless someone can prove me wrong by showing me their weird funnel, I won’t consider increasing the number of supported OTOs at this moment.
Each Product, Order Bump+Product, OTO1, OTO2…etc will be treated as a separate product (order) within Paypal, for that, you’ll have to set up a distinct product for each at your funnel settings.
At the moment, this plugin supports only a single front-end product, plus an optional order bump… I’m still thinking of the best ways to implement multiple products & quantities…Though you may still accept “custom” quantities, variants (colors, shapes…etc) within your Paypal product setup… which is freaking amazing.
Paypal optionally asks your customers for Shipping/Billing Address, disable that option…It’s not needed, and by removing it you’ll get a bit better conversion rate…your customers won’t have to type in their addresses twice.
3. Features
-
Upsells/Down Sells/Cross Sells all supported.
-
2 Step Order Form Integrated… Currently, this plugin only works for the 2 step order form.
-
Order Bumps work amazing.
-
You don’t need to ask your customers about their shipping address on Paypal anymore. In fact better not doing it, it’s proven to help with the conversion rates a bit.
-
Supports up to 4 OTOs per a single upsell page, and can have as many upsell pages as you want.
-
Integrates with any funnel you got, you don’t need a separate funnel for each gateway anymore.
-
Super easy to use, safe, and open source.
-
Works with any Credit Card processor (Stripe, Braintree, BlueSnap…etc)
4. Installation For Dummies!
If you are one of those gals/guys like me ![]() That hate to read or understand the “concept” behind the plugin or simply have no time ready (like most CF users - busy counting money!!!) You can use use the PLUGIN SETUP HELPER!
That hate to read or understand the “concept” behind the plugin or simply have no time ready (like most CF users - busy counting money!!!) You can use use the PLUGIN SETUP HELPER!
5. How To Install (Long Boring Instructions)?
- STEP 1: Linking to the plugin’s files from your funnel’s settings
This Clickfunnels plugin is hosted and managed by our community, thus you really don’t have much to worry about, especially when we roll out any new update/fixes…etc you’ll still get the latest improvements, without having to lift a finger.
Optionally, If you are one of those DIY freaks, you may simply copy our source files which are “not” recommended our source files are hosted within Clickfunnels as well so it won’t slow down your pages at all.
-
Within your funnel’s “SETTINGS” tab.
-
Copy the code below “as is” into your “HEAD TRACKING CODE” zone
Only two lines, that’s it.
Make sure to replace your purchase email here to the actual email you used to purchase the plugin.
<script async type="text/javascript" src="//community.funnelish.com/paypal-plugin.js" data-vip-email="your purchase email here"></script>
<link rel="stylesheet" type="text/css" href='//community.funnelish.com/paypal-plugin.css'></link>
- Save Your Settings.
- STEP 2: Creating Your Paypal Products
After creating your Stripe products (or whatever credit card payment processor you might be using), Now it’s time to create your Paypal products.
- Follow the instructions in the video below, (shout out to Clickfunnels official channel):

Remember; Only copy the Paypal product URL for each and single product you’re selling through that funnel. You don’t need to create any buttons (on click funnels).
- Order Form Setup
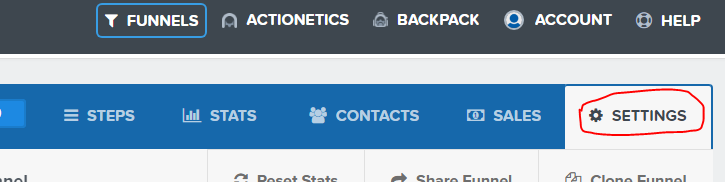
Within your Clickfunnels Order Form funnel step > Settings > Tracking Code
Add these lines as they are to the end of the Header Code box:
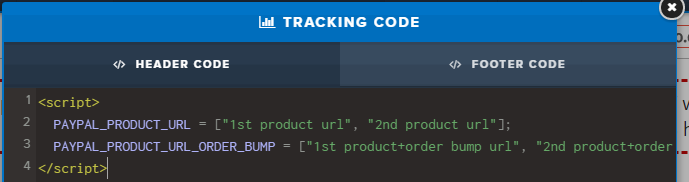
<script> PAYPAL_PRODUCT_URL = ["{A1}", "{A2}", "{A3}"]; PAYPAL_PRODUCT_URL_ORDER_BUMP = ["{B1}", "{B2}", "{B3}"]; </script>Replace {A-Nth} with your N-th Paypal Product URL.
Replace {B-Nth} with your N-th Order Bump Paypal Product URL (In case you don’t have an order bump keep it empty).P.S. Keep the quotes!
P.P.S An Order Bump Paypal URL Must take into consideration all possible scenarios (e.g. 1st Product + Order Bump, 2nd Product + Order Bump…etc as many as you have).Click Save, And your Order Form is now ready to accept payments through Paypal as well.
- OTOs (Upsells/Down Sells/Cross Sells) Setup
For the OTOs the setup is not that much different from Order Form’s setup. For each OTO funnel step add these lines to your Funnel Step > Settings > Tracking Code:
Add the lines below, and replace {OTO#} with your Paypal product URL for All OTOs.
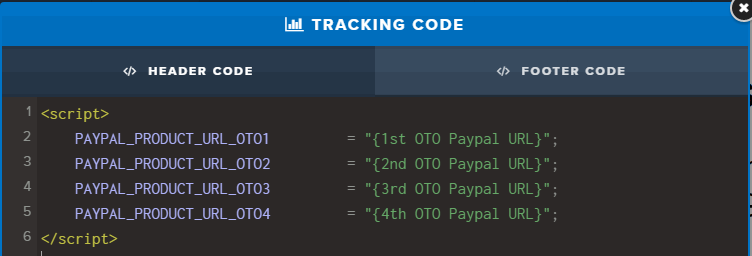
<script> PAYPAL_PRODUCT_URL_OTO1 = "{OTO1}"; PAYPAL_PRODUCT_URL_OTO2 = "{OTO2}"; PAYPAL_PRODUCT_URL_OTO3 = "{OTO3}"; PAYPAL_PRODUCT_URL_OTO4 = "{OTO4}"; </script>In case you only have a single OTO on the page then simply add a single OTO to your page, e.g.
<script> PAYPAL_PRODUCT_URL_OTO1 = "{OTO1}"; </script>In case you have two OTOs on the page then simply add something like,
<script> PAYPAL_PRODUCT_URL_OTO1 = "{OTO1}"; PAYPAL_PRODUCT_URL_OTO2 = "{OTO2}"; </script>Remember, to replace {OTO1}, {OTO2}… with their respective Paypal Product URLs.
- Linking thank you pages, and OTOs altogether.
This plugin won’t interfere with your pre-existing funnel flow, just when it comes to Paypal, do not forget to follow the instructions offered by Clickfunnels team on setting up cancellation redirects and thank you page redirects.
i.e. If you have an OTO redirect people to the OTO page if you don’t simply take them to your Thank You page.
6. 1 Click Upsell Hack For Paypal
It has been always a nightmare to see your customer never coming back to your funnel once they’ve purchased through Paypal, well… that shouldn’t be a problem anymore once you follow the simple tweaks listed below:
-
First, go to the PayPal website and log in to your account.
-
Click “Profile” at the top of the page.
-
Click the “Website Payment Preferences” link in the Selling Preferences column.
-
Switch On the Auto Return button.
-
Input a default Return URL for all your funnels (do not worry this only works as a fallback if you forgot to set it at the product level).
-
Click Save, and Enjoy!
Theoretically, this should be quite better than any credit card 1 Click upsell. Even though customer MUST confirm the purchase on Paypal’s secure web pages without having to re-login every time.
7. Completed
That’s it for now, in case you need any help or have questions reply to this post, or write your own post on the community (feel yourself at home ![]() ).
).
Finally; Let me know if you come across any bugs we can fix, your improvements & feature requests are most welcome as well.
Have a freaking awesome day! ![]()
– @yassine