Every workflow automation starts with a trigger: the event that sets the flow in motion. This guide covers all eight triggers, their settings, and how to scope where an automation runs.
If you haven’t built an automation yet, start with Create a workflow automation.
The eight triggers
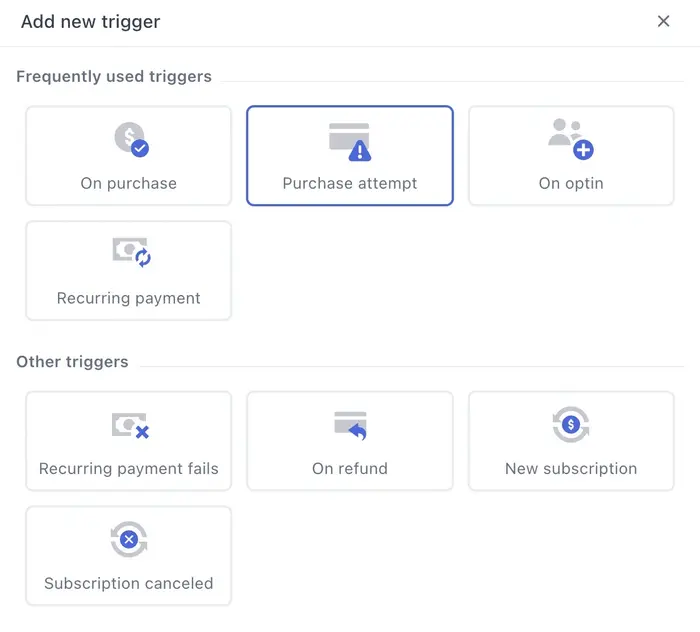
On Purchase
Fires when a valid purchase is completed. The workhorse trigger: purchase confirmations, post-purchase sequences, tagging buyers, notifying your team.
Purchase Attempt
Fires the instant a purchase is attempted: the customer clicked the buy button or headed to a payment provider. It fires regardless of what happens next, whether the payment goes through, gets declined, fails 3DS, or the customer drops off entirely.
Purchase Attempt always fires before a purchase, on every order, successful or not. It doesn’t mean the sale was lost; it means a sale was attempted. Its job is to give you a hook for detecting what happened next: completed, abandoned, or failed.
Because of that, a Purchase Attempt flow almost never acts immediately. The standard pattern is:
-
Purchase Attempt trigger fires.
-
A Wait action pauses the flow, for example 30 minutes.
-
A Condition action checks whether the customer has purchased in the meantime.
-
Only then do the real actions run: if they bought, do nothing (or start a post-purchase flow); if they didn’t, send the recovery email.
That trigger-wait-check pattern is the backbone of every abandoned cart flow, and the abandoned cart recipe walks through it step by step.
Optin
Fires when a visitor enters their email on your page and submits it.
If you’ve enabled auto-optin on the email field, the trigger also fires the moment a visitor types their email on any page, even if they never click submit. The email is captured automatically, which is exactly what you want for recovery flows.
For abandoned cart flows, use Purchase Attempt and Optin together. Purchase Attempt (with the wait-then-check pattern above) covers everyone who reached the buy button; Optin with auto-optin covers everyone who typed an email and left before ever attempting to pay. Between them, you can follow up with both groups.
New Subscription
Fires every time a subscription product is bought. Use it to send subscription purchases to your integrations, or to kick off a welcome sequence for new subscribers.
Recurring Payment
Fires on each recurring payment of a subscription, after the initial one. Useful for keeping your fulfillment or accounting systems in step with every billing cycle.
Recurring Payment Fails
Fires when a recurring payment fails. This is the trigger for dunning: email the customer to update their card before the subscription lapses, and alert your team.
Subscription Canceled
Fires when a subscription is cancelled. Use it for win-back sequences, exit surveys, or cleaning up tags and lists.
The four subscription triggers work with subscription products sold through managed subscriptions.
On Refund
Fires when you issue a refund from within Funnelish. This mainly applies to Stripe refunds, since PayPal refunds can’t currently be processed from inside Funnelish.
Trigger settings
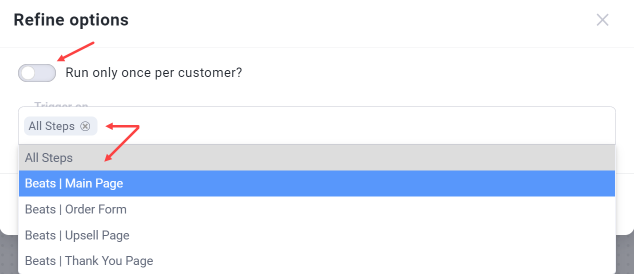
After selecting a trigger, two settings control how it behaves:
-
Run once per customer: switch this on and the automation fires a single time per customer, even if they go through your funnel repeatedly. Almost always what you want for email sequences, so nobody gets the same flow twice.
-
Trigger on steps: choose All Steps, or pick specific steps from the dropdown. An optin trigger scoped to your optin step won’t fire from an email field elsewhere in the funnel.
Trigger filters: scoping where an automation runs
Global automations run account-wide by default, across your funnels, blogs, customer portals, and stores. Trigger filters narrow that down.
When you add a trigger to a global automation, you’ll choose which resources it applies to. Select everything for genuinely account-wide behavior (a purchase confirmation email every customer should get), or pick specific funnels when the flow belongs to a subset, for example a sequence that runs only when a sale happens in funnels A, B, and C.
Funnel automations don’t need filters at that level, since they’re already scoped to their funnel. Their scoping happens through the Trigger on steps setting instead.
Which trigger for which job?
| Goal | Trigger(s) |
|---|---|
| Purchase confirmation email | On Purchase |
| Abandoned cart recovery | Purchase Attempt + Optin |
| Lead nurture after optin | Optin |
| Welcome new subscribers | New Subscription |
| Recover failed subscription payments | Recurring Payment Fails |
| Win back cancelled subscribers | Subscription Canceled |
| Clean up after refunds | On Refund |
Keep Learning
-
Create a workflow automation: the full build walkthrough.
-
Actions reference: what your automation can do once triggered.
-
Recipe: abandoned cart recovery emails: Purchase Attempt and Optin put to work.
Questions about triggers? Reply below or ask in Ask the community and the community will help you out.