You’re spending thousands on ads across Facebook, TikTok, and Google. You log in, and your dashboard says you got 47 purchases yesterday. Great!![]()
But which specific ad actually drove them? Which audience? Which creative angle?
If you’re relying on Shopify’s default checkout, you probably can’t answer that, because Shopify notoriously strips your UTM parameters right before the purchase completes.
This guide shows you how to stop flying blind and preserve your UTM data through the entire funnel, so every single sale connects back to the exact campaign that generated it.
Why UTM Tracking Breaks on Shopify
Here is what usually happens with a standard Shopify store:
-
Someone clicks your Facebook ad with a tracked URL (e.g.,
yourstore.com/serum?utm_source=facebook&utm_campaign=skincare_lal) -
They browse, add to cart, and click checkout.
-
Shopify redirects them to
checkout.shopify.com/... -
The UTM parameters disappear.
-
The order completes with absolutely no record of which ad brought them there.
Your Shopify analytics show a sale. Facebook Ads Manager claims a conversion (maybe—thanks to iOS tracking issues). But your actual order data contains zero information about the campaign, ad set, or creative.
The result: You can’t see which ads are actually profitable at the order level.
What UTM Parameters Actually Track
UTM parameters are simple tags added to your URLs that identify where your traffic comes from. There are five standard tags you should be using:
When these tags actually survive through checkout, you can finally answer questions like:
-
Which creative angle generates the highest Average Order Value (AOV)?
-
Which audience converts fast, but returns products at higher rates?
-
Which campaign brings in customers with the best 90-day Lifetime Value (LTV)?
The Fix: Bypass the Default Checkout
To solve the UTM drop-off, you need to stop sending paid traffic straight to a standard product page and default checkout. Instead, the most effective fix is to use a third-party sales funnel or dedicated checkout builder.
When you use a dedicated funnel, you control the entire journey. Because the customer never gets redirected to a separate checkout domain, your UTM parameters stay locked in from the very first click to the final receipt.
Plus, upgrading to a funnel builder gives you a massive secondary benefit: you can drop in one-click post-purchase upsells to drastically increase your Average Order Value (AOV).
And don’t worry about breaking your backend; the good funnel builders will sync the finalized orders,, inventory, and customer data right back to your Shopify dashboard on autopilot.
How This Works in Funnelish
This is exactly how Funnelish operates. It captures your UTM parameters the second a visitor lands on your page and carries them through every single step of the buying process.
The data flows seamlessly into three places:
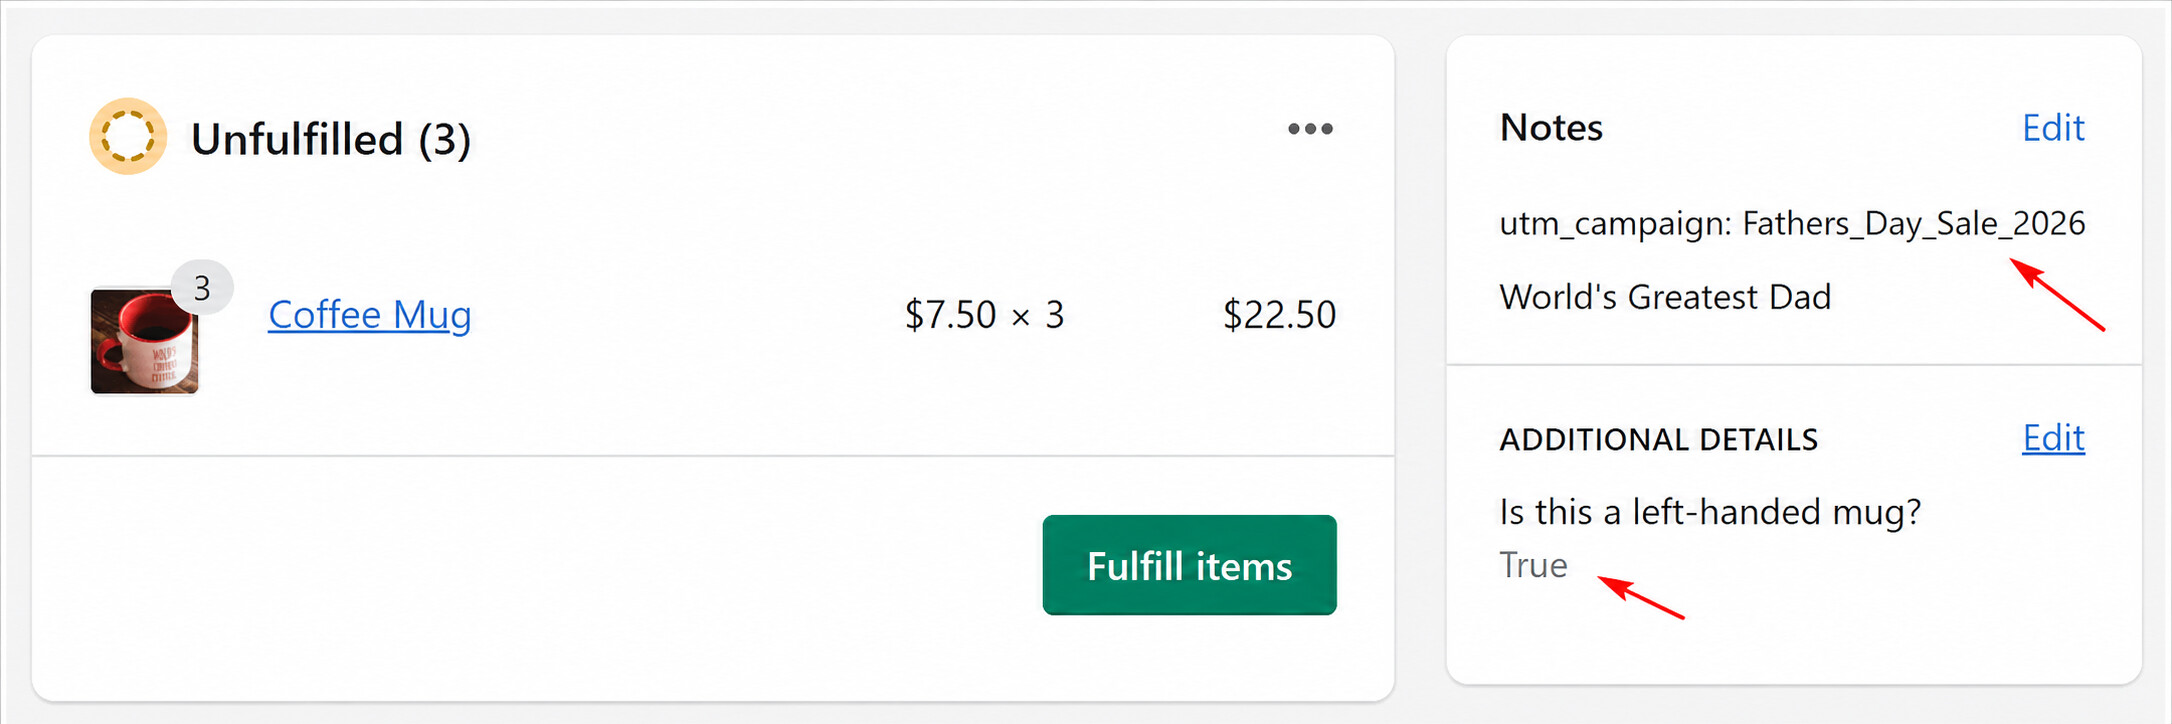
- Shopify Order Notes: You can map your tracking data straight to your Shopify dashboard.
Just add a hidden input field to your Funnelish checkout, name it what you want to track (like utm_source or utm_campaign), and use the to push that exact field value directly into your Shopify order notes on autopilot.

-
Analytics Dashboard: You can filter your funnel performance by campaign, source, or content directly inside Funnelish.
-
Integrations: UTMs pass straight through to your email platform (like Klaviyo), CRM, or analytics tools.
The best part? No code required. No complex Google Tag Manager setup. It just works automatically.
Setting Up UTM Tracking in Funnelish
Step 1: Structure Your UTM Naming Convention
Before you build anything, establish consistent naming rules. Inconsistent UTMs create absolute reporting chaos.
Rules to live by:
-
Lowercase everything.
-
Use underscores
_instead of spaces. -
Be specific enough to identify the exact ad.
-
Keep it readable by humans, not just machines.
Step 2: Build Your Funnel URLs

When creating your ads, append your UTM parameters directly to your Funnelish landing page URL. It should look like this:
yourfunnel.funnelish.com/offer?utm_source=facebook&utm_medium=cpc&utm_campaign=launch_cold&utm_content=ugc_testimonial_v2
Pro tip for Facebook Ads: Use Facebook’s dynamic URL parameters to auto-populate your values so you don’t have to type them manually for every ad:
utm_source=facebook&utm_medium=cpc&utm_campaign={{campaign.name}}&utm_content={{ad.name}}&utm_term={{adset.name}}
Step 3: Verify It Works
Never spend ad budget without testing first!
-
Click your tracked ad URL (or paste it into a browser).
-
Complete a test purchase.
-
Go to Funnelish → Customers and confirm the UTM fields are populated inside Meta Info.
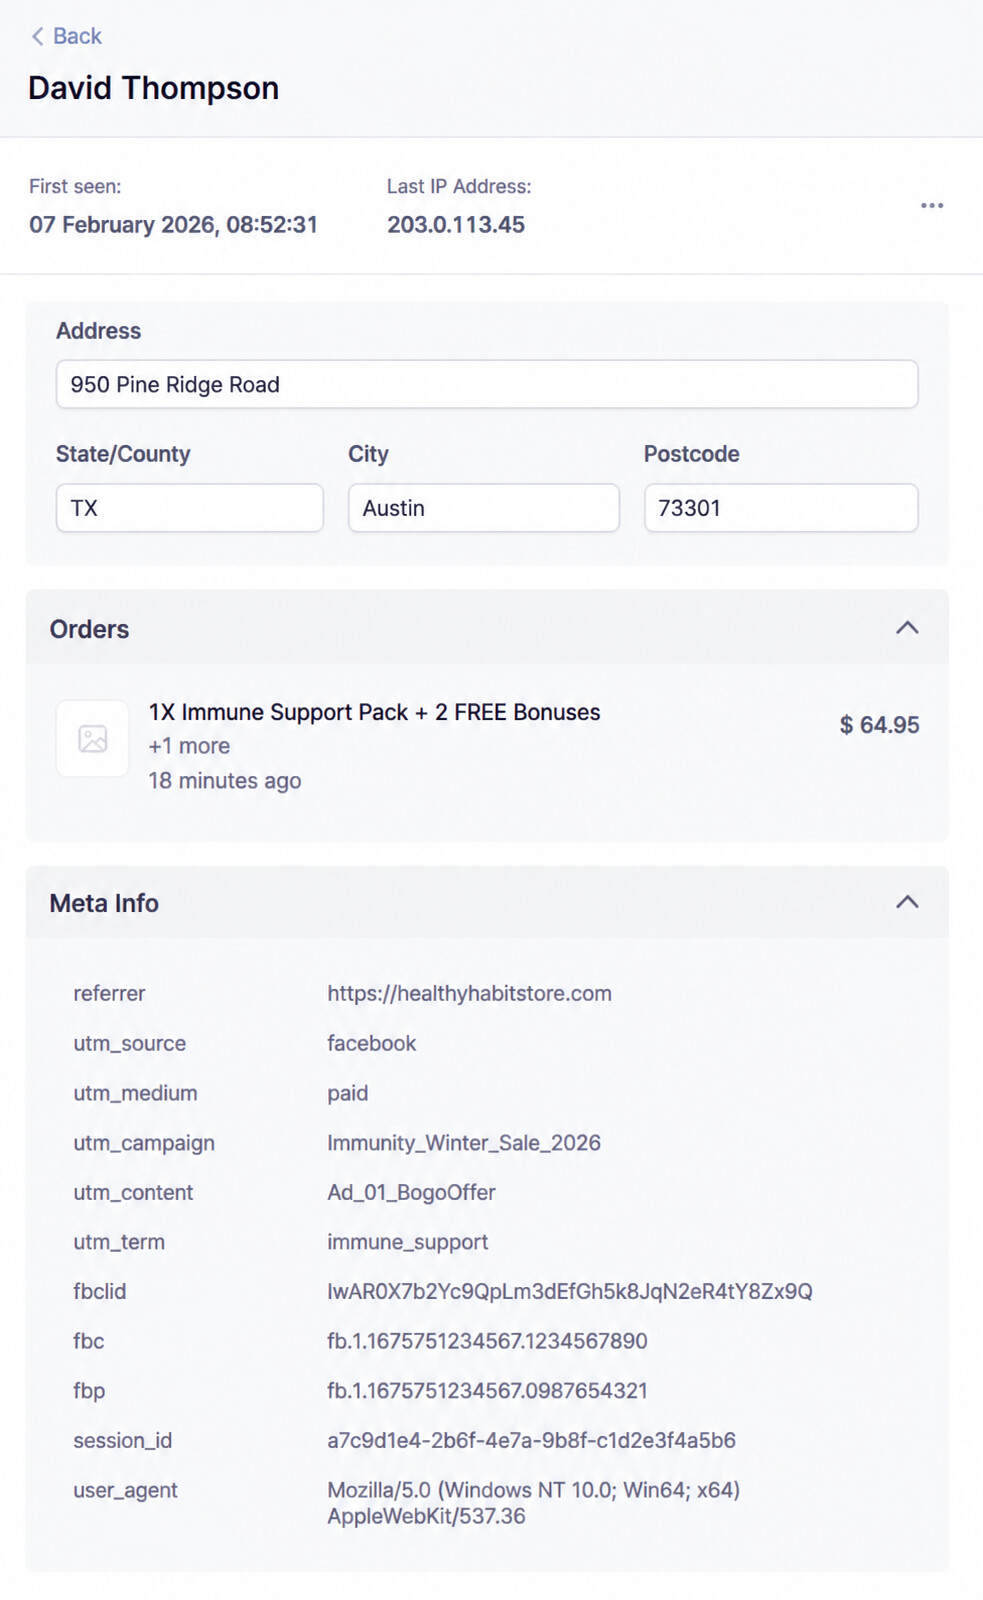
(Note: Make sure you are testing in a normal browser window, as strict incognito modes with ad-blockers can sometimes block tracking).
Step 4: Connect to Your Analytics Stack
-
For Spreadsheet/ Google Sheets Analysis: Export your orders from Funnelish with the UTM columns included to build pivot tables.
-
For GA4: Funnelish events include UTM data. Navigate to Reports → Acquisition → Traffic Acquisition to see funnel performance broken down by campaign.
-
For Klaviyo/Email: Customer profiles will now include UTM data from their first purchase, allowing you to segment lists based on where you acquired them.
The Ground-Truth Data Advantage
Right now, the vast majority of standard e-commerce merchants are flying completely blind. They are scaling ads based on platform dashboards that are notoriously inaccurate thanks to iOS updates and tracking blockers.
By carrying your UTMs all the way through a dedicated funnel, you unlock a massive competitive advantage: ground-truth data.
You will know exactly which creatives drive the highest AOV, which audiences actually have the best lifetime value, and where your most profitable customers come from.
Stop letting your default checkout hold your data hostage. Take control of your tracking, sync those orders back to Shopify, and make your next media buying decision based on reality.
Need help or looking for more tutorials?
![]() Got a question? If you run into any issues setting up your hidden fields or getting your UTM data to sync with Shopify, feel free to drop a reply below or start a new thread in the Ask the community section!
Got a question? If you run into any issues setting up your hidden fields or getting your UTM data to sync with Shopify, feel free to drop a reply below or start a new thread in the Ask the community section!
![]() Read more guides: Looking for more step-by-step strategies to optimize your checkout and tracking? Check out our Documentation category for more in-depth tutorials on scaling your store.
Read more guides: Looking for more step-by-step strategies to optimize your checkout and tracking? Check out our Documentation category for more in-depth tutorials on scaling your store.