If you are only selling one product to your customers and letting them leave, you are leaving massive amounts of money on the table. In the world of dropshipping and scaling DTC brands, the initial purchase often just covers your ad spend. Your actual profit comes from the post-purchase sequence.
Enter the One Time Offer (OTO).
Funnelish allows you to create frictionless, post-purchase One-Click Upsells and Downsells. Because the customer has already entered their credit card details on the Checkout page, they can add these extra offers to their order with a single click—without ever having to re-type their payment info!
Here is how to set up your OTO sequence to instantly skyrocket your Average Order Value (AOV).
 Understanding the Upsell & Downsell Logic
Before you build, you need to understand how Funnelish routes your customers through your ecommerce funnels after they click “Pay Now” on the checkout page.
- Upsell (OTO): A premium upgrade, bundle, or complementary product shown immediately after the initial checkout.
- Downsell: A lower-priced alternative, payment plan, or steeper discount shown only if the customer declines the Upsell.
The Downsell Golden Rule: A Downsell step will ONLY be shown to a customer if they click the “No” button on the Upsell step immediately preceding it. If they click “Yes” on the Upsell, the funnel will automatically skip the Downsell and move them to the next Upsell or the Thank You page.
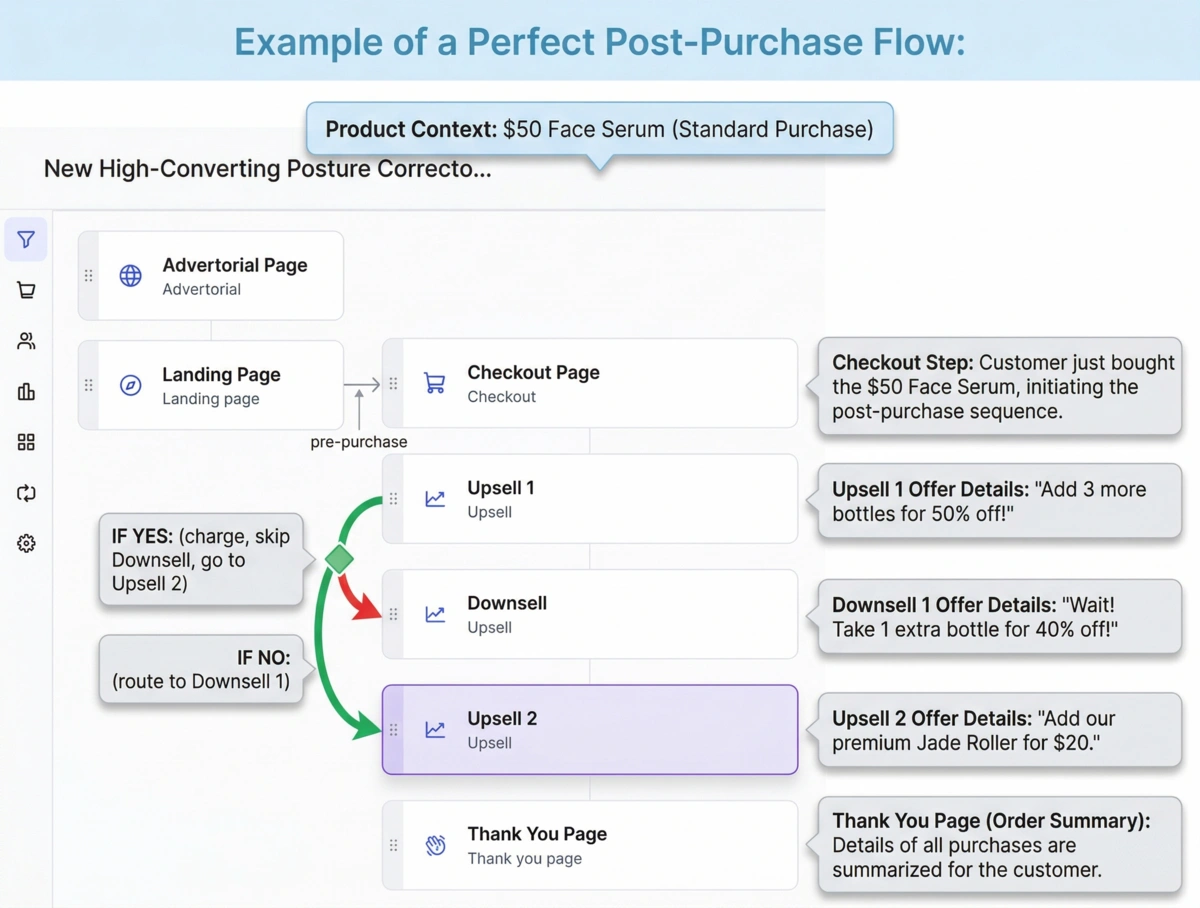
Example of a Perfect Post-Purchase Flow:
-
Checkout Step: Customer buys a $50 Face Serum.
-
Upsell 1: “Add 3 more bottles for 50% off!”
- If Yes: Customer is charged, skips Downsell 1, and goes to Upsell 2.
- If No: Customer is routed to Downsell 1.
-
Downsell 1: “Wait! Take 1 extra bottle for 40% off!”
-
Upsell 2: “Add our premium Jade Roller for $20.”
-
Thank You Page: Order is summarized.
 Step 1: Adding the OTO Steps to Your Funnel
To create your post-purchase sequence, you need to add the correct step types to your funnel timeline.
-
Go to your funnel dashboard.
-
Click New step.
-
Create your page (from a template or scratch) and ensure you select Upsell or Downsell as the Step Type.
-
Drag and drop your steps in the correct order on your funnel dashboard.
Important Placement: Your first Upsell step must be placed immediately after your Checkout step. If you are using a Downsell, it must be placed immediately after the Upsell it is trying to save.
 Step 2: Attaching Products to Your OTO Steps
Just like your Checkout page, your Upsell and Downsell pages need a product attached to them so Funnelish knows what to charge the customer.
-
Click on your Upsell or Downsell step in the funnel dashboard.
-
Go to the Products tab in the step settings.
-
Click Add product and select the specific item or bundle you want to offer on this page.
-
Configure the price. (Pro-Tip: Use a special discounted price here to incentivize the impulse buy!)
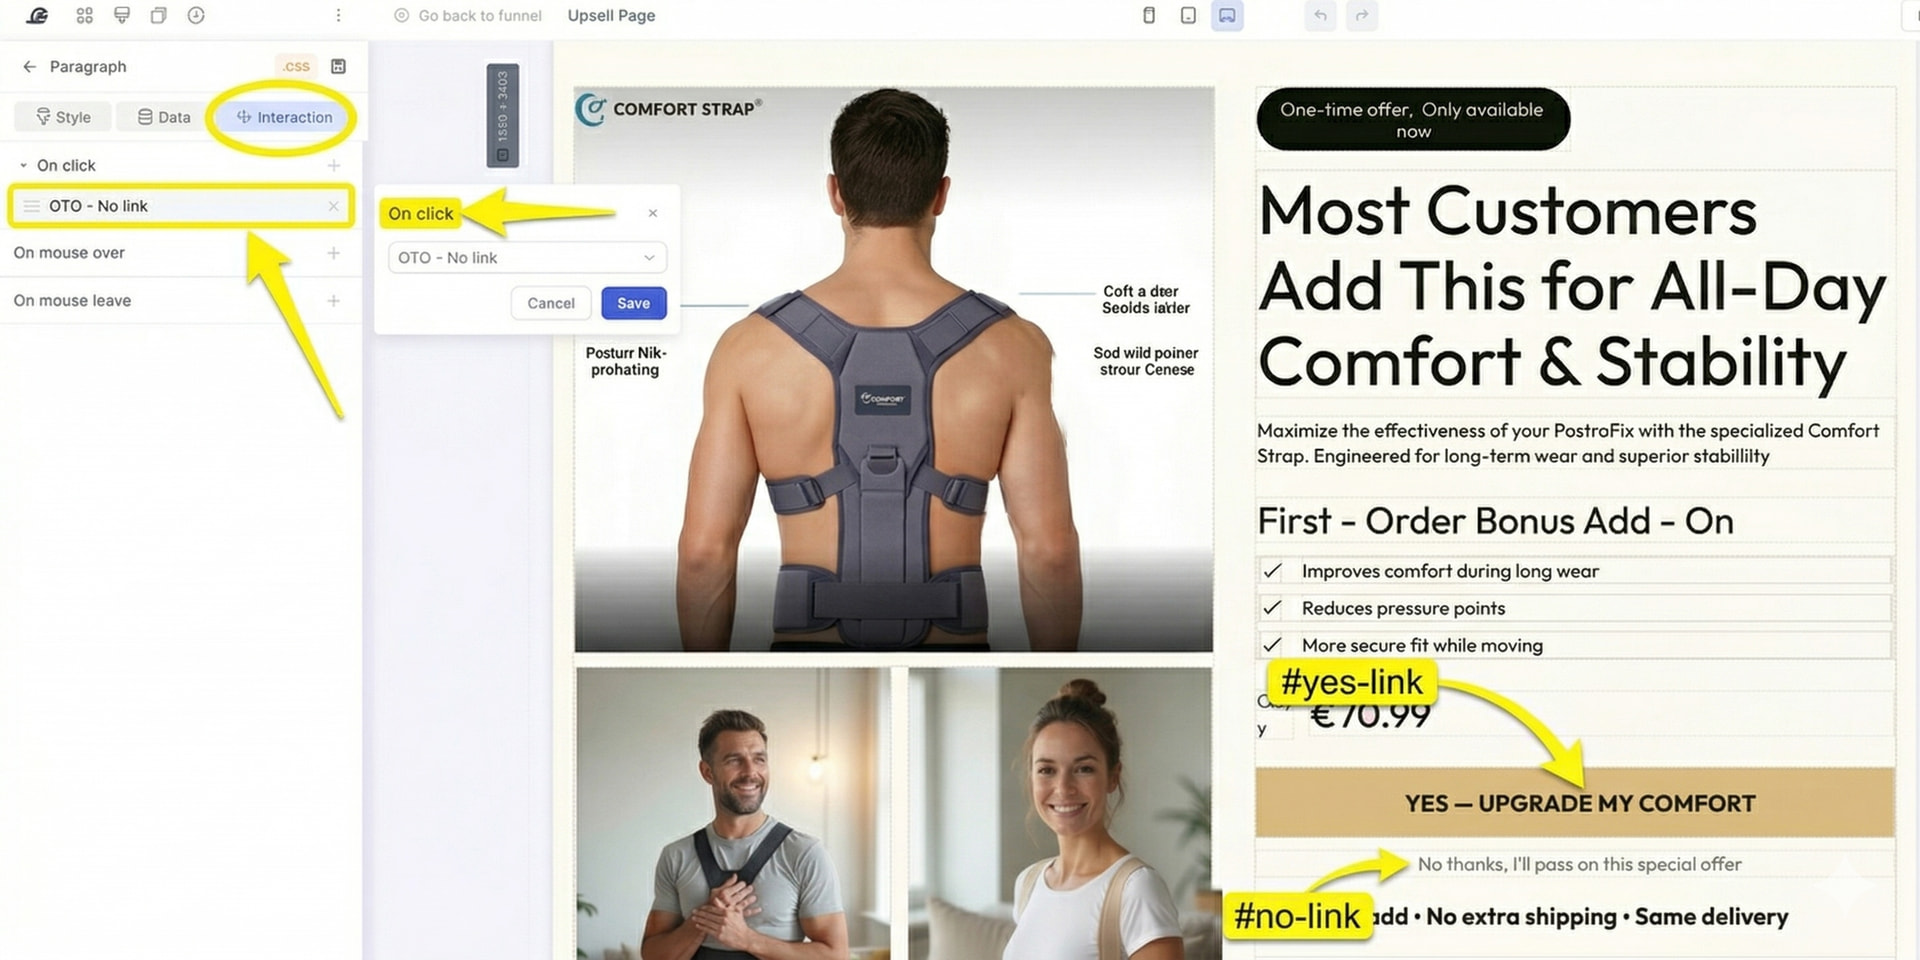
 Step 3: Configuring the “Yes” and “No” Buttons
This is the most critical part of setting up an OTO. You must tell the Page Builder exactly what your Call-To-Action (CTA) buttons are supposed to do. Funnelish uses special button actions to securely process the tokenized “one-click” charge.
Open your Upsell or Downsell page in the Page Builder.
The “YES” Button (#yes-link)
This is the button the customer clicks to accept the offer and instantly charge their card.
-
Click your main CTA button on the canvas.
-
In the left settings panel, find the Button Action dropdown.
-
Select #yes-link (Accepts the offer/Upsell).
-
Advanced Routing: If you have multiple products on the same Upsell page (e.g., offering a Red Shirt or a Blue Shirt), you can route the button to a specific product by typing
#yes-link-[productID]into the custom action field.
The “NO” Button (#no-link)
You must provide a way for the customer to decline the offer. This is usually a simple text link below the main CTA button (e.g., “No thanks, I don’t want to double my order”).
-
Click the text or button you want to use as the decline link.
-
In the left settings panel, set the Button Action to #no-link (Declines the offer/Upsell).
-
When clicked, Funnelish will safely bypass the charge and route the customer to the next logical step (your Downsell or Thank You page).
 CRO Best Practices for One-Click Upsells
To get the highest possible “Take Rate” (the percentage of people who click Yes) on your ecommerce funnels, follow these proven DTC strategies:
-
Keep It Frictionless: Never ask them to choose sizes or colors on an Upsell page if you don’t have to. The best upsell is “More of what they just bought” because it requires zero thinking.
-
Make It Urgent: Add a Countdown Timer element to the top of the page. Explain that this specific discount is only available right now, on this page, and will never be shown again.
-
Use Video: A short, authentic UGC (User Generated Content) video or a message from the founder thanking them for their purchase and explaining the upsell offer drastically increases trust and conversions.
-
Clear “No” Links: Don’t hide the
#no-linkbutton. If customers feel trapped, they will close the browser entirely, which creates confusion and customer support tickets. Make the decline link visible, but use FOMO in the copy (e.g., “No thanks, I prefer to pay full price later”).
 Next Up:
Your customer has navigated your offers and their order is complete. Now it’s time to give them their receipt and build long-term loyalty!
Read the next guide: Designing the Thank You Page