You’ve built a high-converting page layout, but to actually generate revenue, you need to connect your physical or digital goods to your sales flow.
In Funnelish, products act as logical offers rather than strict physical SKUs (like you might be used to in your Shopify store backend). This distinction gives you total flexibility to create unique bundles, set custom quantities, and offer dynamic pricing directly within your ecommerce funnels without messing up your backend inventory.
Whether you are testing a new dropshipping winner, scaling multiple variants for a growing DTC brand, or building recurring revenue with subscriptions, adding and presenting products is incredibly fast.
Important Rule: You add new products inside every funnel individually. Remember that products can only be attached to Checkout, Upsell, and Downsell steps. (Landing pages and Thank You pages do not process payments).
Displaying Your Products: Simply adding a product to a step’s settings does not automatically display it on the live page. To show the product to your customers, you must use a Product list, an Order bump, or build a custom selection block using Data Binding in the Page Builder!
 Products as Logical Offers (The Bundle Hack)
Because Funnelish treats products as logical units, you have the ultimate freedom to build high-converting offers for your ecommerce funnels.
For example, if you are selling a toothbrush, you don’t just have to sell “one toothbrush.” You can create three separate Funnelish products on the exact same checkout step:
- “1x Toothbrush” (Base price)
- “2x Toothbrush Bundle” (Discounted price)
- “4x Family Pack” (Best value)
Even though they all refer to the same physical item, they are presented to the end-customer as multiple bundle options. This makes executing pre-purchase upselling effortlessly simple and instantly boosts your Average Order Value (AOV) across your dropshipping or DTC campaigns.
 Special Strategy: Auto-Selecting Bundles from a Landing Page
A very common scenario for DTC brands and dropshippers is displaying pricing tiers and bundle options directly on a Landing Page or Advertorial. However, since Landing Pages do not process payments, they cannot hold products directly.
So, how do you pass the customer’s selection to the Checkout page? Funnelish gives you two powerful ways to handle this:
1. The URL Parameter Trick
You can instruct the checkout page to automatically select a specific product by passing the Product ID through the URL.
Simply append ?product-id=[your product id here] to the CTA button link on your Landing Page.
(Example: mydomain.com/checkout?product-id=12345)
When the customer lands on the checkout step, Funnelish will automatically select that specific product entry—regardless of whether it’s inside a standard product list, an order bump, or bound to a custom element!
2. The Pro CRO Strategy: Dedicated Checkout Pages
While the URL trick works well, the absolute best practice for maximizing conversions in ecommerce funnels is to create multiple, separate checkout pages—each dedicated entirely to a specific bundle.
Why? Total control over the UX/UI.
If a customer clicks the “Buy 2x” bundle on your Landing Page, routing them to a checkout page specifically designed for the 2x bundle allows you to:
-
Tailor the copywriting to reinforce the exact bundle they chose.
-
Update the hero images to show 2 items instead of 1.
-
Offer highly relevant Order Bumps (e.g., offering “2x Travel Cases” or “Priority Shipping Cover for 2 Items”).
Matching the exact intent of the buyer drastically reduces friction, skyrockets your Conversion Rate and improves AOV.
 Creating a New Product
When adding an offer to your step, you can choose between two main billing models: a One-time product or a Subscription.
Option A: One-Time Products
This is the standard model for most ecommerce funnels where the customer is charged a single time.
-
Open your funnel and click on a step that allows products (e.g., a Checkout step).
-
On the step settings menu, click the Add a new product button.
-
On the pop-up window, select One-time and click Continue.
-
Give your product a Name (this is what your customers will see on the checkout form) and set the Price.
-
(Optional) Switch on the toggle to make this product eligible for the Order Bump feature (great for impulse buys).
-
Click the Create product button.
Your product will now appear in the step’s product list showing its name, price, and type.
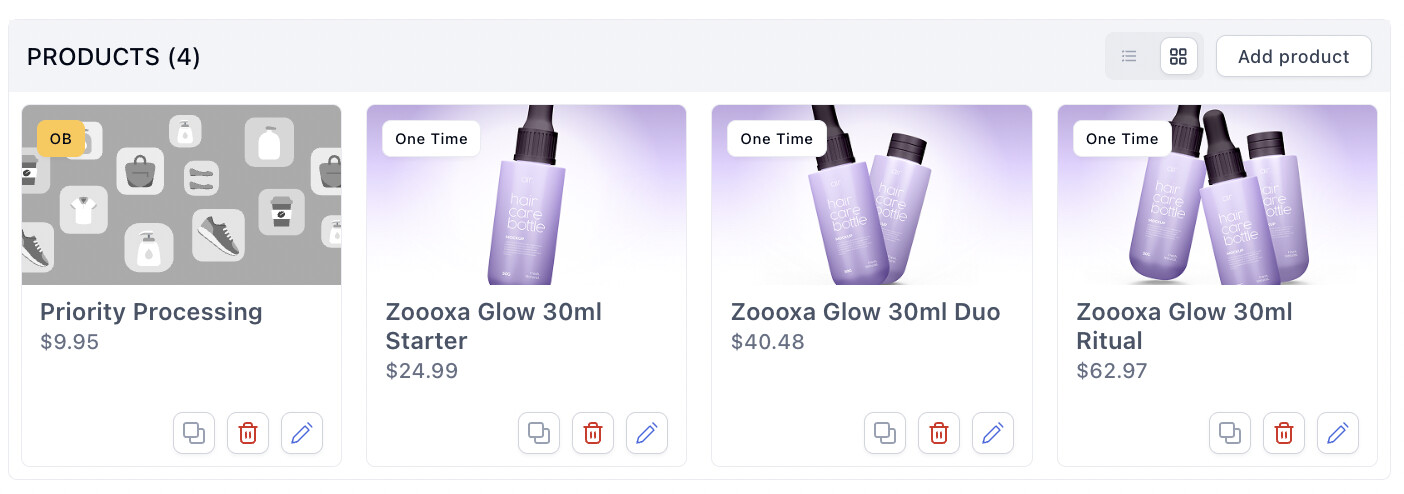
Funnelish products list.
Option B: Subscriptions
If you are selling a monthly supplement box, software access, or VIP memberships, use the subscription model to generate reliable recurring revenue.
-
Open your funnel and click on a valid step.
-
Click the Add a new product button.
-
Select Subscription and click Continue.
-
Give your product the title your customers will see.
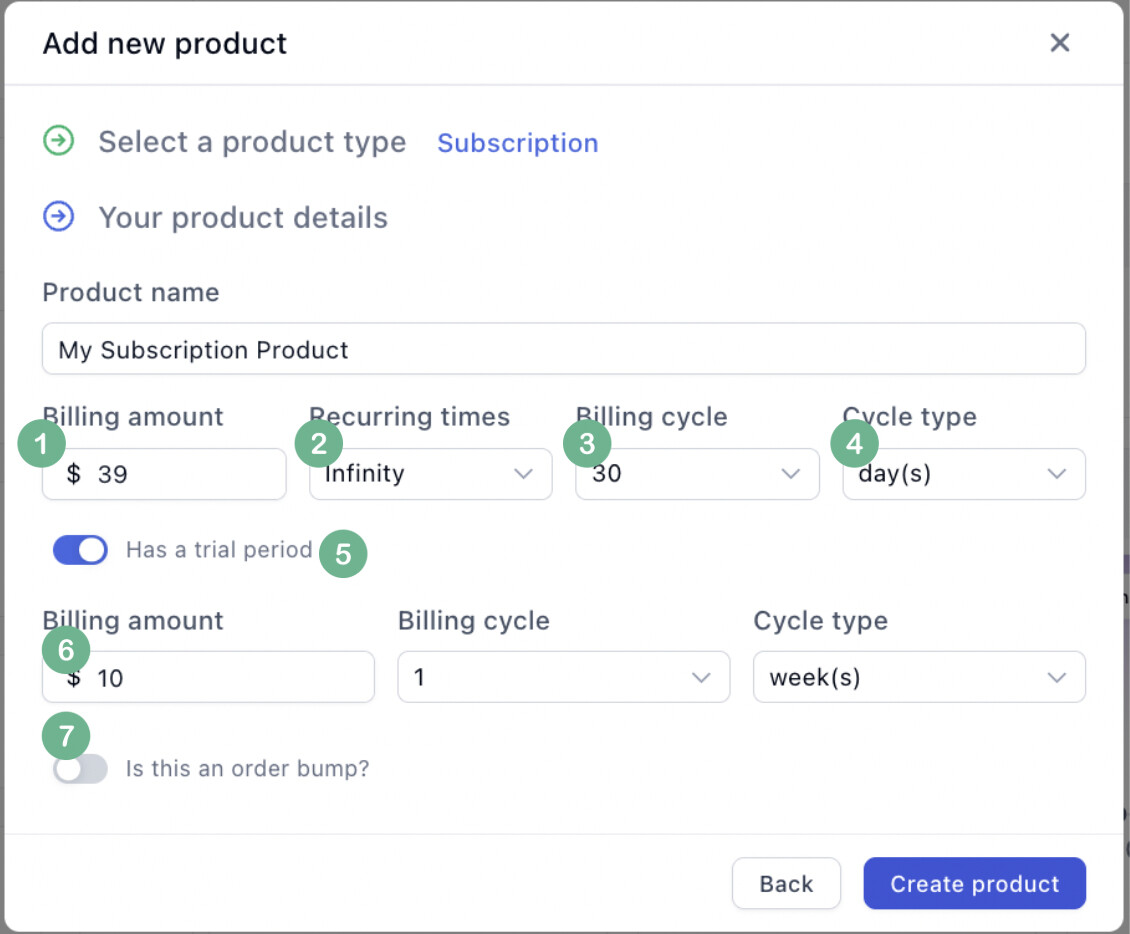
-
Input the price your customers will be charged per billing cycle.
-
Set how many times the billing amount will be charged (leave blank or set to infinite for ongoing subscriptions).
-
Define the period between charges and the timespan (e.g., every 1 Month, or every 2 Weeks).
-
(Optional) Toggle on Has a trial period to offer a test run. If you want it to be a free trial, set the Trial Billing amount to
0. -
Click Create product.
 Displaying Products: Standard Lists vs. Custom Data Binding
Once your products are created, you need to present them to your customer. Funnelish gives you two ways to do this:
1. The Standard Way: Product Lists & Order Bumps
You can drag the pre-built Product List or Order Bump elements directly onto your canvas. These automatically populate with the products you configured in your step settings.
2. The Advanced Way: Custom Blocks via Data Binding (Funnelish v2)
You do not have to use a static product list to show your products! Funnelish v2 allows you to build completely custom blocks using Data Binding.
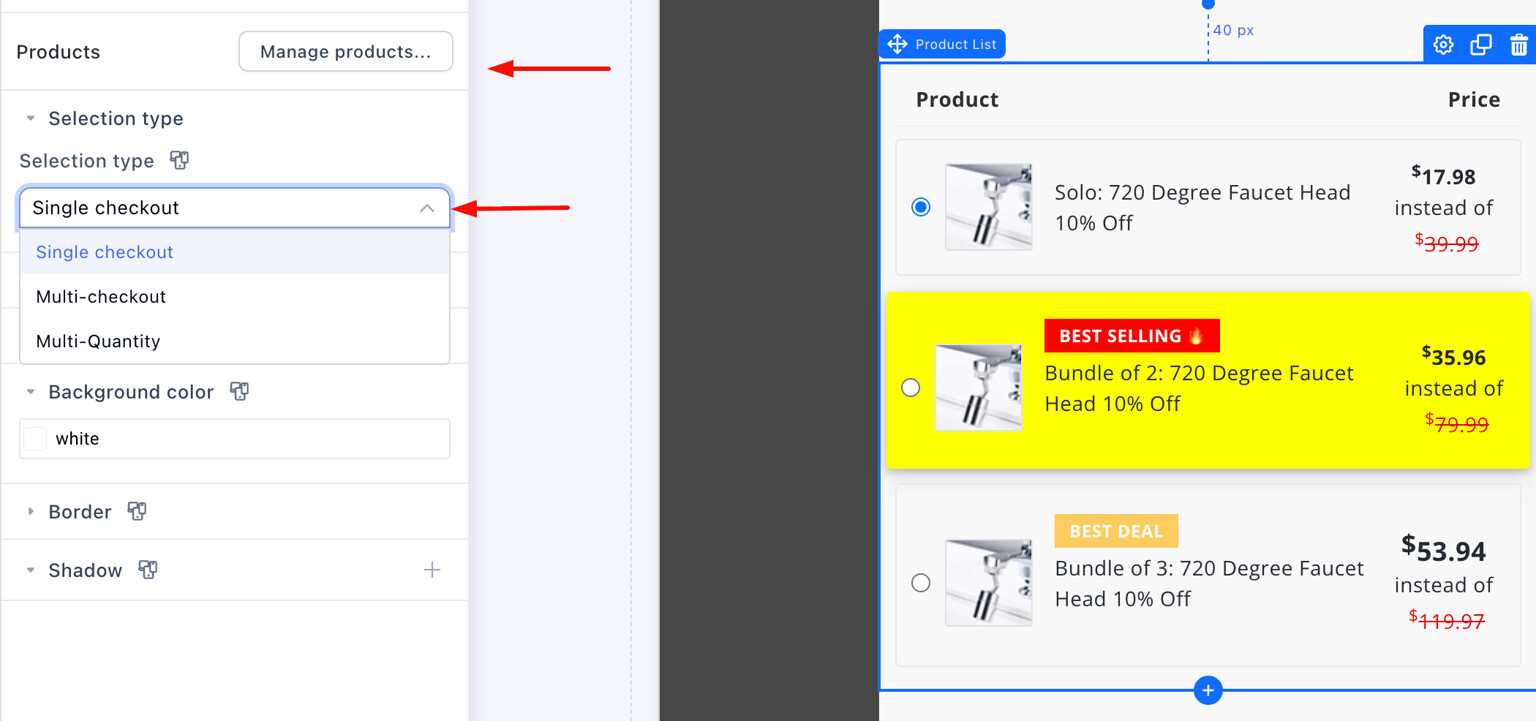
Any element bound to a Product ID is instantly considered a “product selector.” This means you can give your customers the ability to select a product by clicking on virtually anything: custom containers, images, buttons, or text links.
How Selection Behavior Works (Single vs. Multi-Select):
-
Single-Select (Radio Behavior): If you bind a product to an element (like a Container) and there is no radio button or checkbox inside of it, Funnelish automatically assumes it is a single-select offer. Under the hood, we embed a hidden radio button to replicate standard behavior. Selecting this container will automatically deselect any other single-select product on the page.
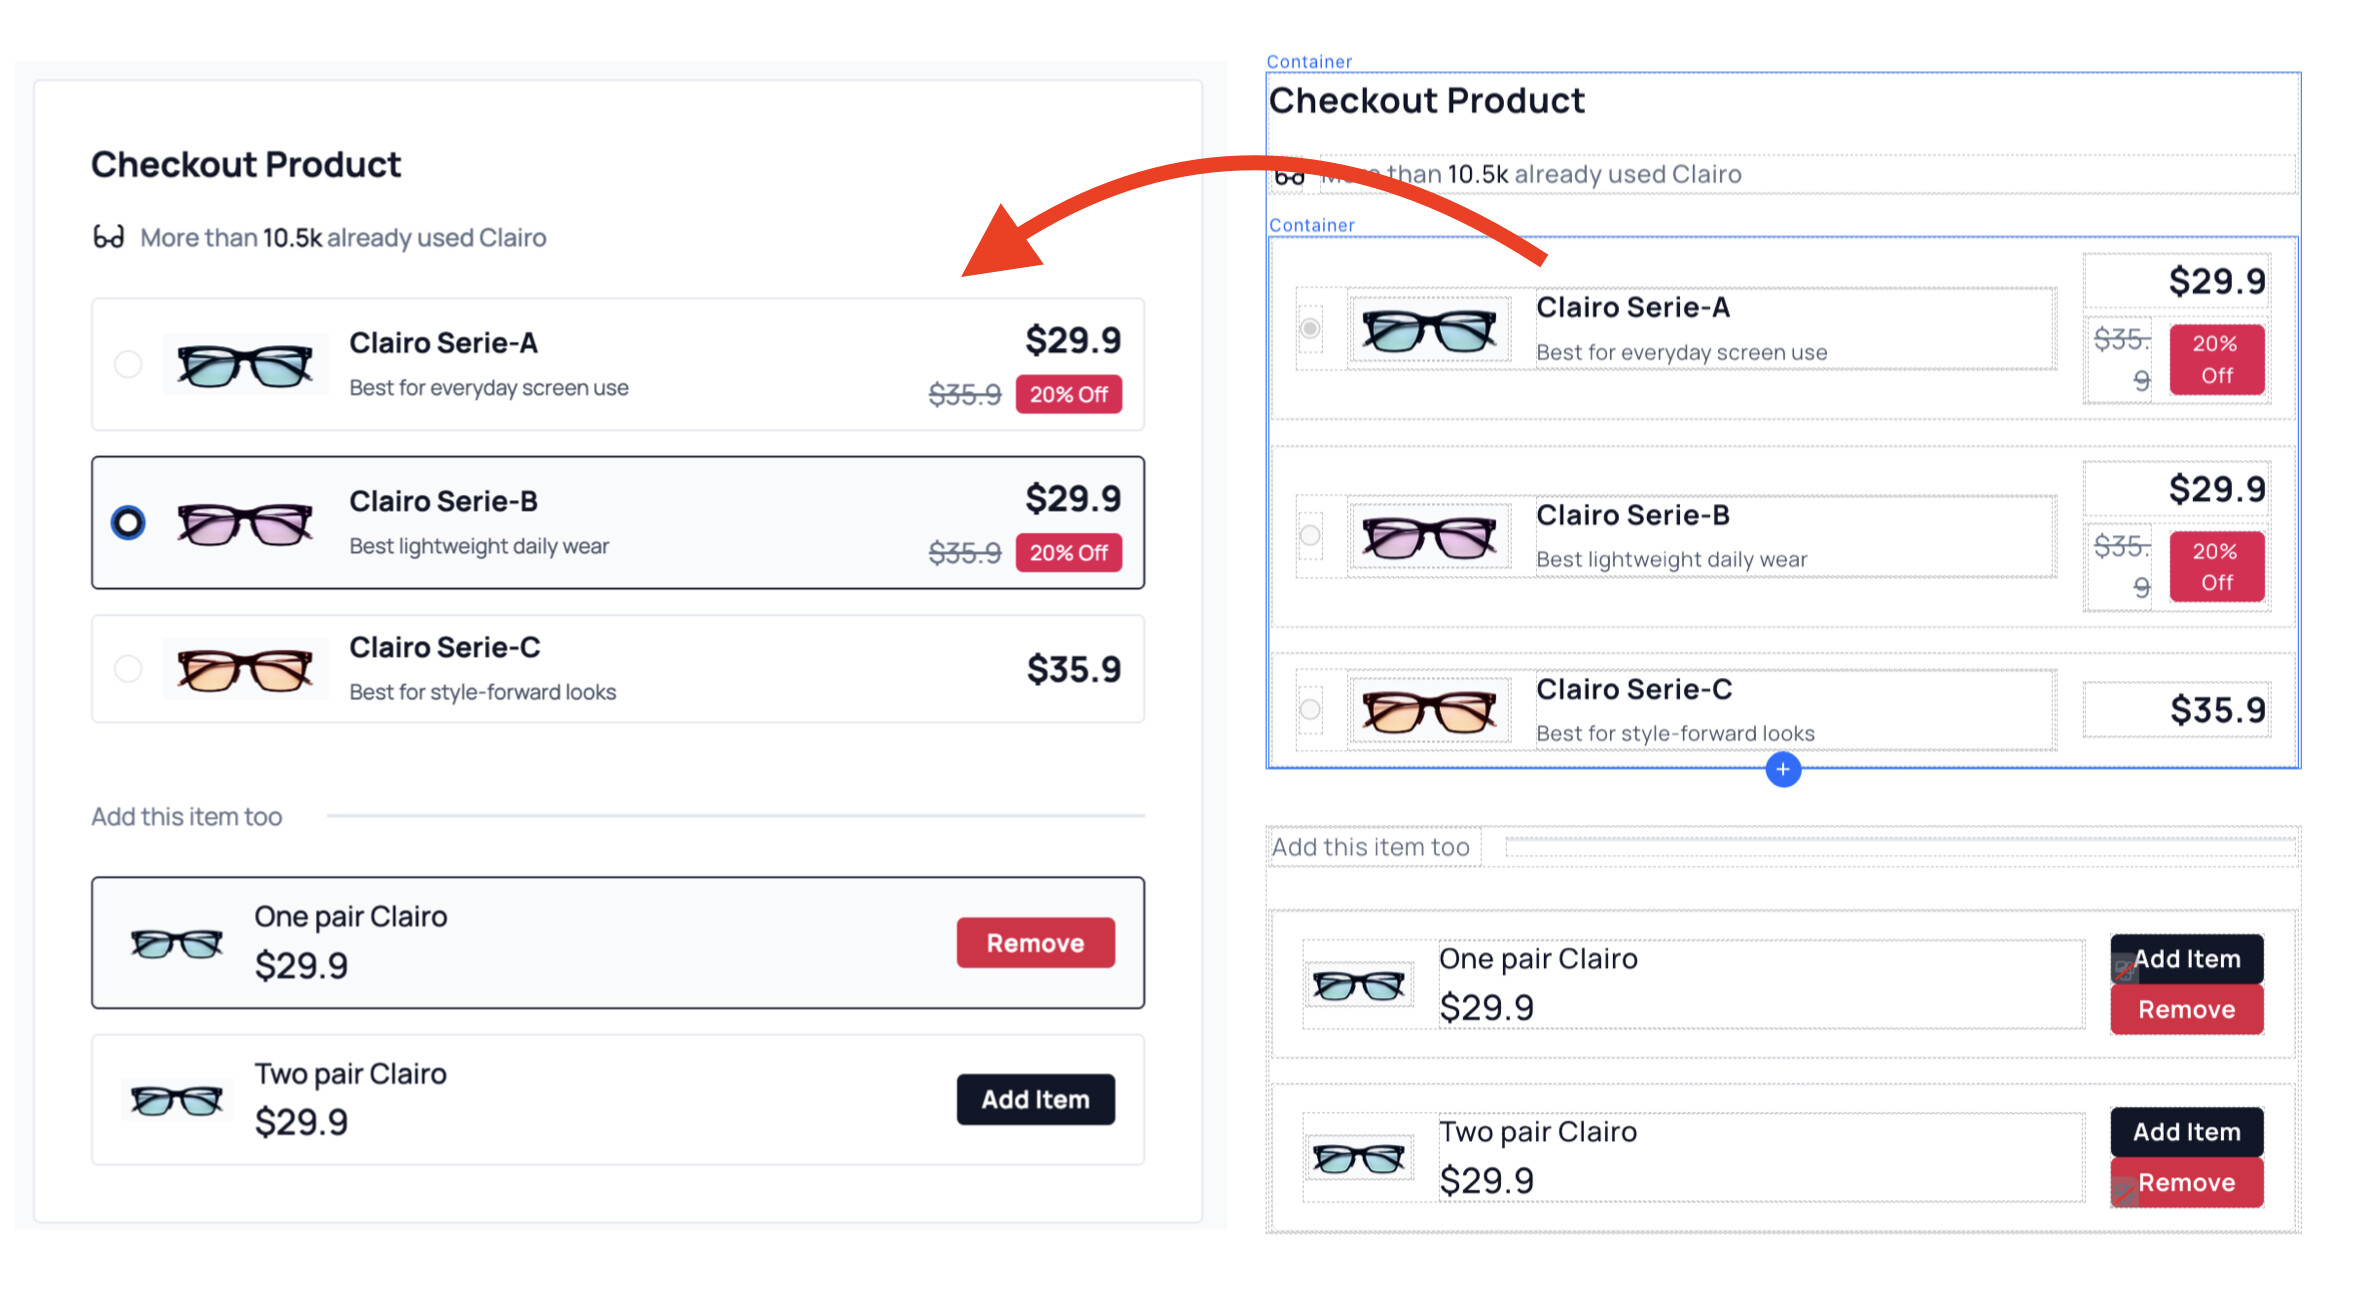
-
Multi-Select (Checkbox Behavior): If you want to allow customers to select multiple products at once (like adding an extra accessory alongside their main bundle), you must add a Checkbox element inside your bound container. Set the Checkbox data type to “Product ID” and bind it to the product. Funnelish will now treat this as a multi-select item.
-
Selection Groups: You can take this even further by setting a different “Selection Group” for your radio and checkbox buttons. This allows you to create advanced layouts with multiple independent product groups on the exact same page!
This gives you the ultimate flexibility to build complex, highly stylized product representation blocks (like custom pricing tables or interactive grid bundles) without writing a single line of code—perfect for scaling Shopify brands that need fully custom checkout experiences!
To make your custom product selectors feel alive, use Element > States in the Page Builder. You can customize theHover,Selected, orCustomstates to change the border color, background, or drop-shadow of your container in response to visitor clicks. This provides instant visual feedback when a customer selects a bundle!
 Editing & Customizing Your Product
After creating your products, click on any product in your list to open its settings window. From here, you can add images and configure advanced conversion settings.
Product Images
Click on the product image placeholder to upload a high-quality thumbnail of your product. This image will automatically display inside your Product List or Order Bump elements.
Advanced Product Settings
Scroll down in the settings window to find these powerful layout behaviors:
- Select by default: Automatically pre-selects this product on the checkout form. Pro-Tip: Pre-selecting your middle-tier bundle is a proven way to boost Average Order Value (AOV).
- Hide from the product list: The customer will not see this product on the funnel, but it can still be processed.
- Ecommerce Funnel Hack: Combine Select by default and Hide from the product list to automatically and invisibly charge a base shipping fee on every order!
- Highlight: Automatically adds an attention-grabbing yellow background to the product tile on your live page.
- Tags: Add subtle, colored badges (like “Most Popular” or “Best Value”) next to your product name. You can customize the background color and text size.

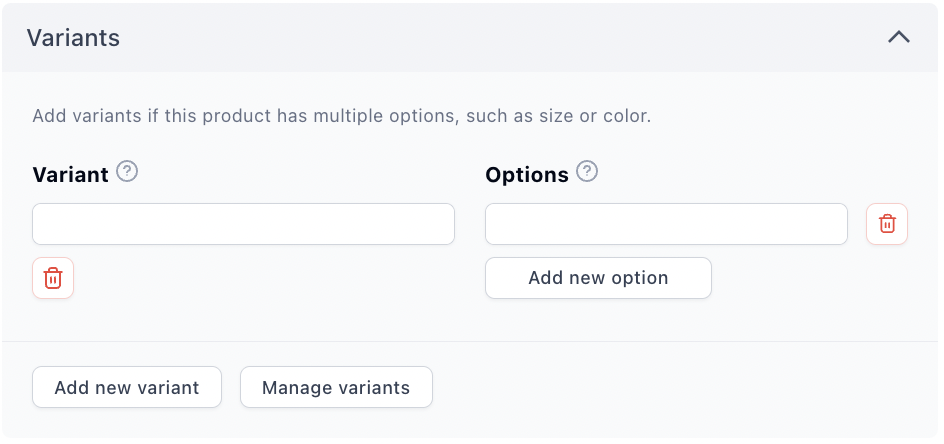
 Adding Variants (Sizes, Colors, etc.)
Variants are a group of products that share the same core qualities but come with different attributes (like a T-shirt that comes in Small, Medium, and Large). Funnelish makes managing variants for your DTC store incredibly simple.
Step 1: Create the Variant Options
- Click a product to open its settings window.
- Scroll down to the Variants section.
- Click the Add new variant button.
Adding variants.
- Enter the variant Name (e.g., Size, Color, Weight).
- Enter an Option (e.g., Small, Red, 250g).
- Click the Add new option button to add more choices. Repeat until all your variants are listed.
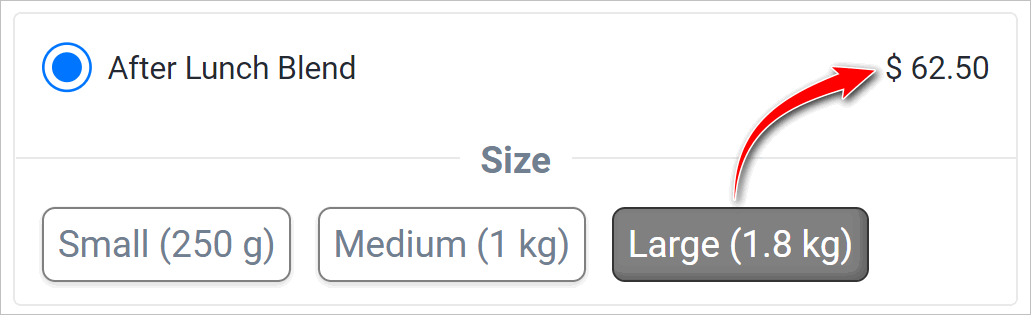
Step 2: Manage Variant Pricing and Images
By default, every variant inherits the price of the base product. However, if your XXL shirt costs more than your Small shirt, you can set custom prices.
- Click the Manage variants button.
- Upload unique images for specific variants (e.g., uploading the Red shirt image for the Red variant).
- Enter custom prices for specific options if needed.
- Click Save changes.
When a customer views your live funnel, selecting the product will elegantly expand a folder showing the available variants and instantly update the price if a premium option is chosen.
 Next Up:
You have your pages designed and your physical or digital products attached. Now it’s time to make sure you can actually collect the money!
Read the next guide: Configuring the Checkout Step